‘Book Mystique Review: ProSoft Drive Genius 2.1.0 Disk Tools Suite
Wednesday, October 1, 2008
by Charles W. Moore
If you’ve been around Macs long enough to remember the Classic OS days, you probably remember Symantec’s Norton Utilities and SystemWorks, which were the dominant players in the MAc OS disk and system maintenance/repair utility category for many years, in 2004, fairly early on in the OS X era, Symantec announced that further development of Norton Utilities and its SystemWorks suite of companion disk and system tool applications would be terminated at the time OS 10.3 was replaced by OS 10.4 Tiger, and that was that.
The departure of Norton Utilities seemed huge at the time. Like many Mac veterans, I’d been using Norton Utilities almost as long as II had been using Macs, but it turned out to be less disruptive than many of us thought it would be. For one thing, OS X with its robust UNIX underpinnings is a lot less likely to suffer directory damage in crashes and so forth than back in the old Classic OS era, and secondly because some very worthy successors were poised to step into the role Norton once reigned as king-of-the-hill in.
One was AlSoft’s Disk Warrior, a one-trick pony focused exclusively on directory diagnosis and rebuilds, which it does superbly, although again there is a lot less compelling need for its services with OS X. Then for those of us who want a more comprehensive bag of disk maintenance, diagnostic, and repair tools, the up-and-comer was Prosoft’s Drive Genius, which incorporated and expanded on the feature sets of several Mac OS utilities developed by New Zealand-based SubRosaSoft, particularly Disk Guardian (which Drive Genius replaces), the VolumeWorks partitioning tool, and others.
Originally introduced in at Macworld San Francisco in 2005 , Drive Genius, which has just been released in version 2.1.0 - a free upgrade for Version 2.x owners - is a suite of disk maintenance, repair, management, and optimization tools designed from the ground up specifically for Mac OS X. Drive Genius’s powerful toolkit includes a drive optimizer, a comprehensive repair facility for analyzing, repairing and rebuilding volumes, plus testing capabilities with media surface scanning, performance benchmarking and data integrity checking. It can be used to initialize drives, create and delete partitions on-the-fly, and erases them securely as per Department of Defense’s standard. Drive Genius can also hide partitions and duplicate volumes or drives swiftly. Drive Genius features advanced tools for resizing (repartitioning) and moving of volumes without reformatting, and sports a sector editing tool to modify the data on any sector of the drive - powerful features that will satisfy even the seasoned Mac experts. Drive Genius has a shredding feature that erases drives securely per the Department of Defense’s standard.
According to Prosoft, Drive Genius 2’s most popular feature is drive defrag which combines all the empty free space on your drive together into one contiguous block, which improves the overall speed and performance of the drive. Drive Genius 2 is used at Apple’s Genius Bar in the ProCare Program for this primary feature, since OS X only optimizes �les under 20MB in size and it doesn’t address drive fragmentation. Drive Genius was named “Labs Winner” as the best tool in its class by MacUser UK magazine 2 years in a row.
Brand new in Drive Genius Version 2.1.0 is the DriveSlim tool that intelligently finds and frees up space on your volumes that is redundant or unused, which represents a step onto Disk Warrior’s turf. The Shred tool has been enhanced and now shreds individual files or complete folder hierarchies as well as volumes and disks, plus there’s a new single-pass zero option.
Version 2.1.0’s enhanced Repair tool finds corrupted preference files and performs additional volume repair and rebuild actions which is another page out of Disk Warrior’s book of tricks. Arguably (I’m sure it’s what Prosoft would argue), with Drive Genius you should now be able to get along very well without Disk Warrior, while enjoying the much more comprehensive range of features in Drive GEnius.
Drive Genius got a major facelift when it was upgraded to Version 2 with a new very cool and tastefully-done animated interface and repackaged on a single DVD that can boot both PowerPC- and Intel-based Macs to perform the utility’s maintenance, management, and optimization functions. Drive Genius can also be installed on your hard drive or on an external volume, and my preferred mode of using it - installed on an external boot drive, which is much faster than booting from the DVD. More on that in a bit.
Drive Genius 2.1.0 includes powerful features that give the user greater flexibility and control in setting up and managing your hard drives.
- Analyze, Repair and Rebuild OS X directory information.
- DriveSlim tool that intelligently finds and frees up space on your volumes that is redundant or unused
- Defragment OS X drives for optimum performance.
- Create high-speed backup clones of most devices.
- Edit devices, volumes and files with the sector editor.
- Securely erase drives using U.S. DoD specification algorithms.
- Long range throughput tests for performance and diagnostics.
- Benchtests for comparing drive performance.
- Surface scanning to test for media faults.
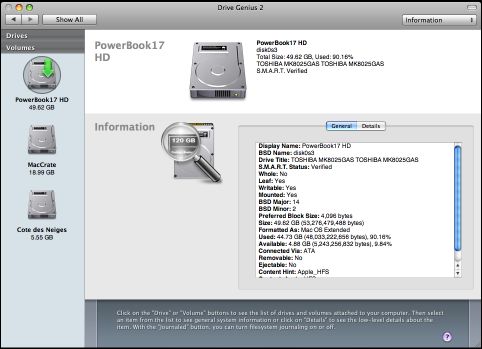
- Detailed information on drive and volume structure.
- Format a comprehensive range of drives in OS X format.
- Resize partitions without erasing them.
- Comprehensive Support including ATA, SCSI, Firewire and USB drives.
- Streamlined User Interface allowing most operations to be accomplished in a few clicks.
- Bootable DVD-ROM support ranging from PowerBooks to Macbooks.
Drive Genius has comprehensive hardware support including ATA, SCSI, Firewire and USB drives, and includes bootable CD-ROM support for OS X capable machines ranging from first generation iMacs to the latest PowerBooks.
The program’s user interface design is vastly more attractive that the dated “brushed metal” look that blighted previous versions.
Most Drive Genius functions require a fairly intuitive three-step process to complete a task:
1. Select a hard drive or volume in the main window.
2. Select an operation.
3. Select a parameter and apply it to the drive or volume.
Select a task you want to perform by moving the mouse over and clicking on one of the icons in the middle of the screen.
For operations such as copying, partition resizing and sector editing, you will need to enter additional information pertaining to the operation. Shredding, information, benchtest, integrity checking and initialize don’t require any additional information.
Prosoft sensibly recommends backing up your data before using many of the features in Drive Genius and regularly; that way, if anything goes wrong (virus, power blackout, OS error or hardware failure etc…), you will be able to recover your data.
To Verify or Repair a volume, the core function in drive maintenance software, select from the popup menu whether you want to verify, repair, rebuild the volume, or repair permissions.
Repair
Repair is a tool for verifying and repairing most kinds of hard drive faults. It analyzes the volume for a general overview and can repair/rebuild the volume. It can also be used to enable and disable Apple journaling and fixes OS X file permissions on your boot volume. Drive Genius 2.1.0’s enhanced Repair tool now finds corrupted preference files and performs additional volume repair and rebuild actions
Repair should be run whenever excessive system crashes occur. It also pays to run this periodically as it is not unusual for minor faults to appear on a hard drive.
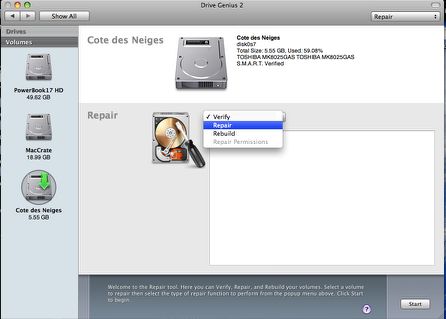
Repair Mode Functions include:
• Verify: Check a volume for errors.
Runs a general scan over the volume to detect any errors.
• Repair: Check for and repair any found errors on a volume. Checks the volume for any errors, and attempts to repair them if they are found. If the volume has been having serious problems, it is recommended to repeat Repair until it stops reporting that errors have been fixed.
• Rebuild: Rebuild the drive table that holds the file information. This will rebuild the portion of the drive (known as the Catalog B-Tree) that contains information pertaining to the location of all of the files on the volume. It is a separate utility from the Verify and Repair functions and may be used separately to repair faulty volumes. Since it rebuilds the structure based on the existing content of the rest of the drive, it can potentially fix errors that Repair tools cannot.
• Repair Permissions: Correct the ownership and permissions according to Apple specifications. Repair Permissions will correctly set the permissions to solve most of problems related to permission issues.
If you are initializing your boot drive or you only have a single drive connected to your system, you will need to boot the system from the Drive Genius CD.
DriveSlim
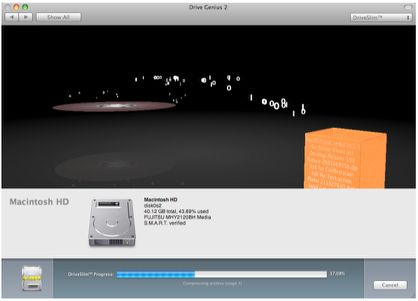
DriveSlim is a new feature in Drive Genius 2.1.0, a tool to help recover drive space by deleting large, duplicate, or unused files. Through DriveSlim’s various slimming plans, Drive Genius 2 will detect and recommend files that can be deleted from your system to help free space on your hard drive. DriveSlim can help you determine what files can be deleted when your hard drive gets near its full capacity.
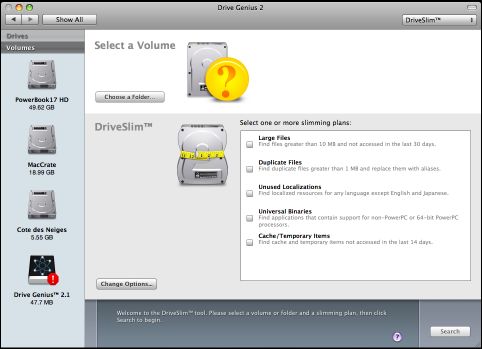
Each Slimming Plan individually searches for files that can be deleted from the system to save space. The Slim Plan Options menu allows you to fine tune your slim plans and help filter out specific files from your hard drive. By adjusting the sliders and checking various options, you can locate files that may be bloating your hard drive.
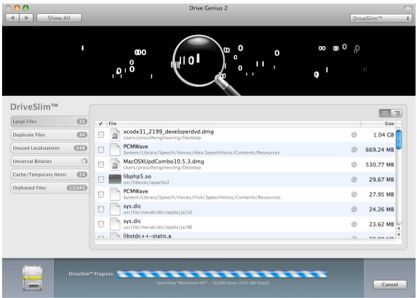
Large Files:
Finds files that are greater than a set minimum size and have not been accessed in a period of time you specify. The detected minimum size can be from 5MB to 100MB. The period of time can be 0 to 365 days.
Duplicate Files
Finds any files that are greater than a set minimum size that have duplicates. The detected minimum size can be 0MB to 100MB. You have an option to replace any deleted duplicates with an alias pointing to the original file.
Unused Localizations<
Finds all localized resources for any applications and lets you specify what languages you want to keep. This will help delete any unnecessary language files from your applications. You can select any other languages to be kept by marking the selected language.
Universal Binaries:
A Universal Binary is a container for multiple application binaries, each optimized for a specific CPU. For any given application, there are up to 4 possible binaries in one file (Intel, Intel 64-bit, PowerPC, PowerPC 64-bit), which your machine uses run the application. Intel-based Macs do not need
PowerPC binaries, and vice versa. DriveSlim detects and deletes any unnecessary binaries that your computer hardware cannot run. You can choose to keep 64-bit binaries by enabling “Keep 64-bit variants” in the Slim Options.
Cache/Temporary Items:
Finds all cache and temporary files that have not been accessed in a period of time you specify. The period of time can be set from one to 31 days.
Orphaned Files:
For expert users only. Finds files which the system determines are not associated with an application. Due to the nature of applications using private file types, this search may find files that are actively used by an application. Therefore, the results of the search should be carefully reviewed before making a decision to delete files. It is highly recommended to backup these files prior to deleting the files from the hard drive. To enable Orphaned Files, go to the Expert Preferences menu by holding
the Control and Option keys and enable Expert Tools.
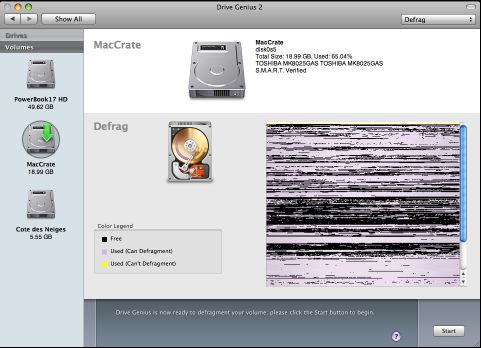
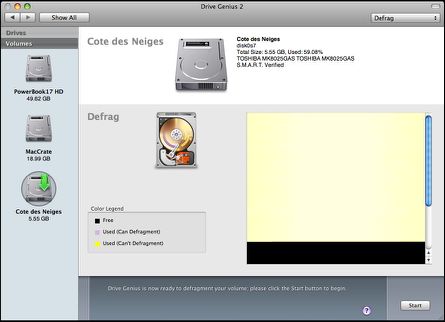
Defragmenting
Adding and deleting files to and from your hard drive will gradually cause your hard drive to become more and more fragmented. When the OS writes files to the drive, it will look for empty spaces on the hard drive to write data to. If the space is too small to fit the file, it will write part of the data in one area and the remaining to another area. This way less overall disk space is wasted, but drive access will slow down, as the read/write head has to scan multiple parts of the drive to locate and read a file. The more you use your your drive, the more fragmented the data on it will become. Consequently, defragmenting your hard drive from time to time can boost the performance of your computer by putting all of these broken up pieces into one continuous block with all of the empty space at the end.
To defrag your drive with DriveGenius, you select the Volume you want to defragment by highlighting it. once the volume integrity is successfully verified, the defrag process can begin.
The screen shows the fragmentation of the volume:
• The yellow portion represents the data has already been defragmented.
• The lavender portion represents file that hasn’t been moved yet.
• The black portion represents the free space.
Here’s what the fragmentation map of one of the partitions on my PowerBook’s hard drive looked like at the start of the process.
Drive Genius gives you a running readout of what is happening as the defragmentation proceeds. It is not a quick process, and can take half an hour or so to a day to defrag a high capacity drive (depending on how fragmented it is, but Drive Genius 2 has a new, very entertaining animation you can watch while the disk defrag proceeds.

Here’s the finished job, all neat and tidy:
Duplicate
The Drive Genius Duplicate function copies all the information from the source drive to the destination drive. A copy of the source drive is made to the destination, so if you backup your startup drive, a bootable copy of it is created, with all information such as file permissions preserved.
Unlike some backup programs which copy file-by-file, Drive Genius utilizes a method called device copy. Using device copy enables you to retain every detail of the original drive, from bootablity to the icon locations. Device copy is also a lot faster than the traditional file-by-file backup.
Drive Genius 2 also supports duplication of drives and volumes. For drive copy, Drive Genius will duplicate an identical copy of the drive. For volume copy, an identical volume is first duplicated, and then Drive Genius will apply a proprietary resizing technology to expand the volume size to the maximum, so no space is wasted. Duplication can be to another drive or to a disk image file.
To Duplicate your volume, launch Drive Genius or boot from the Drive Genius CD. In the Drive Genius Volume window, select the volume you want to backup. The information on the target drive will be replaced with the information on the source volume. If you want to archive to a file instead then select “New Disk Image” as the target.
To Duplicate a device, launch Drive Genius or boot from the Drive Genius CD.
In the Drive Genius Device’s window, select the device you want to clone. Select the target device from the pop-up menu. Click the button to proceed.
To cancel, click on the button. Drive Genius requires the source and the target devices to be unmounted before proceeding with the duplication. You will need a Drive Genius bootable CD or start up from another drive.
The information on the target drive will be replaced with the information on the source volume. If you want to archive to a file instead then select “New Disk Image” as the target. Drive Genius 2’ volume copy is designed to work with OS X volumes. Using Drive Genius 2 on an OS 9 only volume may remove the ability to start up OS 9 from that partition. Drive Genius 2 does not affect the data on OS 9 volumes at all.
Drive Genius 2’ device copy will work with almost all file systems including OS 9, Linux and Windows.
Drive Genius 2 can only duplicate HFS+ volumes (almost all formats can be duplicated in the device view) Drive Genius 2’ Device Duplication function clones an exact image of the original drive. Drive Genius 2 utilizes a method called “device-to-device copying”. Using device copy enables you to retain every detail of the original drive, from boot ability to the icon locations. Device copy is a lot faster than the traditional file-by-file backup when duplicating a relatively full drive.
Sector Edit
Drive Genius’ Sector Edit allows expert users the ability to access and modify bits and bytes of a volume or a disk. It is strongly suggested that you not use this function unless you are extremely proficient with raw hex data, which I am emphatically not. Editing the data using Sector Edit may render your data files unreadable, or even corrupt your drive.
To perform a low level Sector Edit on your drive, in the Drive Genius Volume window, select the volume you want to perform a sector edit. You can also perform sector edit on a device by selecting a drive under device view. You can use the sector edit window on any file by using the file menu to open a document.
I did not try this. See the Drive Genius documentation for full details.
Speaking of which, Drive Genius ships with a very thorough, nicely illustrated 100 page PDF user’s manual, which includes many illustrations and graphs and a section of advanced information about optimization and fragmentation, and another on moving swap files.
Shred
Drive Genius’ Shred function may be used for securely erasing the contents of a volume or the whole drive. The only secure way to erase your drive is by writing repeated passes of various data patterns.
Version 2.1.0’s enhanced Shred tool now shreds individual files or complete folder hierarchies as well as volumes and disks. In addition, there is now a single-pass zero option.
Shred overwrites the volume or the drive with three passes and ensures all previous data will never be recoverable. Drive Genius’s Shredder function conforms to the U.S. Department of Defense standard for drive sanitization (DoD 5220.22 M), and it works with IDE (ATA), SCSI, USB, and Firewire hard drives. The current version of Shredder does not support RAID drives.
Drive Genius can shred either a volume or the whole drive. If you are shredding your boot volume or your startup drive, you will need to boot the system from the Drive Genius CD, or boot of from another drive with Drive Genius installed.
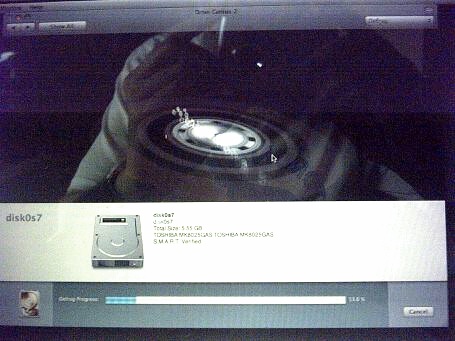
Integrity Check
Drive Genius’s Integrity Check is a suite of diagnostics designed to test the overall integrity of the drive by writing and reading various block sizes to and from the drive. Integrity Test measures and reports various aspects of the drive subsystem including the driver, the drive controller, the cabling, the drive’s motherboard and the head seek mechanism.
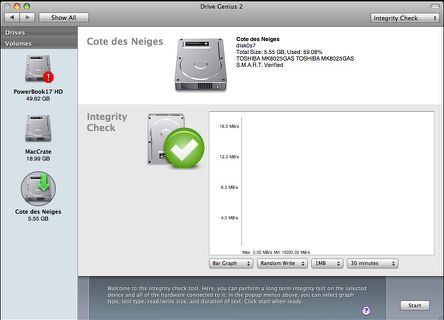
The transfer size ranges from 2 KB to 16 MB. For setup such as mail server or accounting server, test the drive at 2 KB block. Database servers do lots of little searches and hardly ever read lots at a time so small blocks are a good test. Use a bigger block size if you use the drive for graphic intensive application and digital audio and video applications.
The length of test can be varied from one minute to one day. The longer the duration given to the test, the more reliable the results are. Start with smaller time frames and give it a longer period to detect more subtle flaws.
Benchtest
Drive Genius Benchtest is a tool to test the performance of different drivers, CPU’s, operating systems, and data-transfer efficiency of large and small volumes. For example, digital video users can use Benchtest to see how differing custom driver and mode page settings affect the efficiency of video capture and web server administrator can find out how the volume performs under small file transactions.
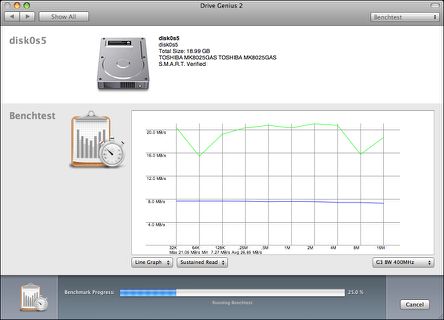
Benchtest reports the results in either graphical or numeric formats. You can export the results as high quality images, or save them as files. You can also import files that others have saved and Drive Genius comes with a set of them from most current Macintosh systems. You can select these for a live on-screen comparison between your system and others.
Benchtest will perform the following tests on the drive selected:
• Sequential read test measures how many times single-block reads can
be performed in one second. This test is affected by read caching (the larger the read cache, the faster
the performance).
• Sequential write test measures how many times single-block writes can be performed in 1 second. This test is affected by write caching (the larger the write cache, the faster the performance).
• Random read test measures drive performance for reads of blocks of
data from 2 kilobytes to 16 megabytes. For small block sizes, seek time and rotational latency are weighted more heavily. For large block sizes, the transfer rate is weighted more heavily.
• Random write test measures drive performance for writes of blocks of
data from 2 kilobytes to 16 megabytes. For small block sizes, seek time and rotational latency are weighted more heavily. For large block sizes, the transfer rate is weighted more heavily.
Depending on the speed of the drive and the CPU, it may take up to ten minutes to finish the test. The test data is updated as soon as each task is completed. A status bar marks the progress of the test. You can click on the Red button to stop and exit from a test in progress. It may take a few seconds before the test is cancelled. Depending on the display option you selected, the final result can be in the form of a bar chart, line graph or formatted text.
Bar graph - Draws a bar graph comparing your drive with your choice of a comparison drive.
Line graph - Draws a line graph comparing your drive with your choice of a comparison drive.
Raw data -- Displays the numerical figures rather than representing the information graphically.
Scan
Drive Genius Scan is another ex-Disk Guardian feature designed to verify that every sector block on your volume or drive can be read correctly. It is recommended to run this test if you notice abnormal sound emitting from the drive, or the Finder reports some of the files cannot be copied.
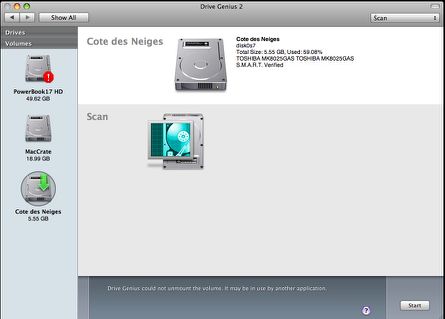
The time required for a Scan test is dependent on the drive’s capacity and rotational speed. The blocks are read in sequential order and the operation is performed on all blocks. Drive Genius will not remove bad blocks — you may need to reformat the drive with Drive Utility that comes with Mac OS.
Initialize
Drive Genius 2’s Initialize feature lets you prepare a disk for general use. Most hard drives are already formatted at the factory. However, almost none of them are ready for Mac use. Initialize will:
• Install the Apple driver
• Write a partition map
• Create a new volume and mount it to the desktop
Initializing will wipe out the first few thousand blocks of the drive in order to place a device driver and the partition map on the drive. The rest of the drive is intact but files that were previously on the drive will not be accessible any more. If you accidentally initialize a drive and it contains information that you did not backup, you will need software such as “Data Rescue” to recover the files.
If you are initializing your boot drive or you only have a single drive connected to your system, you will need to boot the system from the Drive Genius 2 DVD.
Apple’s journal file system keeps a log of the hard drive’s main data activity. In the case of a crash or other system failure, the file system can retrieve lost data by consulting the “journal” log, restoring the system to its previous state instead of having to go through the lengthy process of rebuilding it. However, it is important to note that enabling Journaling can potentially slow drive access time down by up to 10% — an issue of particular concern to laptop (or Mac mini) users, whose drives are on the poky side already. In certain instances nevertheless, Journaling can be preferable in situations where data stability is more important than drive access speed. Personally, I prefer to keep it turned off on my ‘Books.
To turn journaling on/off with Drive Genius: In the volume view, select a mounted volume you want journaling to be turned on/off. Click the icon on the bottom of the window. From the Repair window, check or uncheck the Journaled check box to turn journaling on or off.
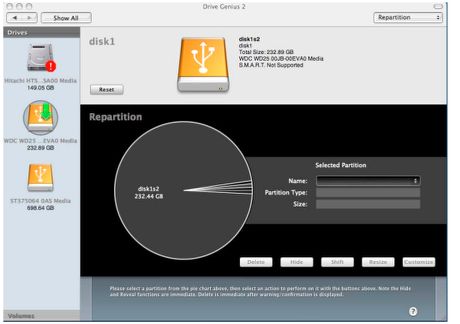
Repartition
Drive Genius Repartition enables you to resize and manage partitions (volumes) on your hard drives, allowing you to expand or shrink partitions without erasing them. You can use the Repartition feature to create and delete partitions. Drive Genius also includes many custom icons that can be automatically applied to your newly created partition. The Repartition feature can hide partitions from users as well, and has the ability to shift a partition on the hard drive in addition to reconstructing partition maps.
Repartition is designed to work with OS X partitions. Using it on OS 9 volume may remove the ability to start up OS 9 from that partition. It does not affect the data on OS 9 volumes.
Partitions can be moved forwards and backwards on the hard disk allowing you to combine free spaces into one. When you shift a partition, the partition’s data is unaffected.
I didn’t repartition a drive for this review, but several years ago I used an earlier version of Drive Genius to repartition the 20 gigabyte IBM hard drive in my iBook which I had originally divided into virtual volumes of 11, 3, and 5 gigabytes respectively, with another 900k or so occupied by the drive formatting. I figured I could shrink the middle partition down to one gigabyte and thus give myself a couple of gigs more breathing space on the main partition, enlarging it to 13 GB, which would compensate for the extra bulk of OS 10.4 Tiger and a bit more besides.
The first step was to defragment the 3 GB partition so that its contents would be all the tidily clumped together.
Once you select the volume or partition to work on, you can select the task you want to perform by clicking on one of the icon buttons on the toolbar at the bottom of the window. For operations such as adding, resizing, and shifting partitions, you will need to enter additional information pertain to the operation. Click the Reset, Delete, Hide, and Resize to select the appropriate function.
For example, to resize a partition, which is what I wanted to do that time, you click the Resize button and use the slider in the dialog that appears to select the desired new size of your partition and press Start to continue. You can also type in the new size of the partition.
To expand a volume, select the hard drive you want to work on, click on the Resize icon button, and use the slider to select the new size of your partition and click Start to continue. You need to have free space below the volume you want to expand. You can’t expand a volume if there is no free space adjacent to it. If the free space partition is on top of the volume you want to expand, you will need to use the Shift function to move the volume up before expanding the volume.
With the partition defragged, I was able to use Drive Genius’s resize function to shrink the middle volume down to one gigabyte, which left a new free space of two gigabytes. However, the opened up space was positioned beneath the newly resized partition, and I wanted to expand the topmost partition.
The entire operation went smoothly, and I encountered no problems then or since. The little iBook has been running happily on the Drive Genius repartitioned drive for several years now.
Since I had moved all of the files on two partitions, I decided it would be wise to run Disk Warrior and check for directory damage. Sure enough, Disk Warrior found some problems on the OS X partition, but they were easily repaired.
Booting from the Included DVD
As previously noted, Drive Genius 2 ships on a single Universal DVD that will boot both PowerPC-based Macs and Intel-based Macs.
To start up from the bootable DVD, hold down the C key as the computer starts up. If you are working on your startup drive, you will have to boot from the Drive Genius 2 DVD or another drive with Drive Genius 2 on it.
Drive Genius 2 booted my old 1.33 GHz G4 PowerBook with no problems other than that the bootup process took more about four minutes. The program functioned smoothly, if a bit lazily while booted from the DVD, and I checked out defragmenting one of the partitions on my hard drive as described above in DVD boot mode. However, my recommendation would be to consider installing Drive Genius on a bootable FireWire hard drive for the speediest and most convenient operation.
Drive Genius’s main competitors are Micromat’s TechTool 4, and Alsoft’s DiskWarrior.
Among these applications, only Drive Genius supports: Resize volume -- on the fly (no reformatting); Shift/shift volume -- on the fly (no reformatting); Add/Delete a volume; Reset a hardware copy device; Hide/Reveal a volume; Device Cloning (100% identical to original); Clone Windows/Tivo/Linux drives; Device/Volume backup to image; Bad block recovery/cloning; Fault tolerant backup; Initialize Drive; and OSX partitioning for block devices.
In summary, Drive Genius has always been an impressive application with an amazingly comprehensive range of functionality, and with version 2.1.0 it is better than ever. This program is definitely something you’ll be glad to have around when your hard drive needs either first aid or intensive care, and will also make drive management more convenient with many more alternatives and options. Being as it’s competitively priced with competing applications, it offers excellent value.
New in Drive Genius Version 2.1.0:
* Brand new DriveSlim tool that intelligently finds and frees space on your volumes that is redundant or unused.
* Enhanced Shred tool that now shreds individual files or complete folder hierarchies as well as volumes and disks. In addition, there is now a single-pass zero option.
* Enhanced Repair tool that finds corrupted preference files and performs additional volume repair and rebuild actions.
* Enhanced S.M.A.R.T. reporting if an error is detected (via the Information tool).
* Many other tool and UI enhancements to make Drive Genius even more useful and easier to use.
* Bug Fix: Benchtest results and Drive information can be saved once again.
* Bug Fix: Mouse wheel scrolling works.
* Other bug fixes.
Minimum System Requirements:
Drive Genius 2 requires a system with a G4 or later processor with at least 256MB or more of RAM that is capable of running Mac OS X 10.4.9 or above.
Drive Genius sells for $99.00.
Drive Genius 2 also allows users to try out the software. The trial version has part of
the feature set disabled. To use in Trial mode, click Trial. For users interested in
purchasing Drive Genius 2, go to:
http://prosoftengineering.com
The following features are not enabled in the trial version:
• Benchtest
• Repartition
• Integrity Check
• Duplicate
• Sector Edit (Writing)
• Defragment
• Initialize
• Repair and Rebuild
For more information, visit:
http://www.prosofteng.com
and
http://www.prosoftengineering.com/products/drive_genius.php
Note: Letters to PowerBook Mystique Mailbag may or may not be published at the editor's discretion. Correspondents' email addresses will NOT be published unless the correspondent specifically requests publication. Letters may be edited for length and/or context.
Opinions expressed in postings to PowerBook Mystique MailBag are owned by the respective correspondents and not necessarily shared or endorsed by the Editor and/or PowerBook Central management.
If you would prefer that your message not appear in PowerBook Mystique Mailbag, we would still like to hear from you. Just clearly mark your message "NOT FOR PUBLICATION," and it will not be published.
CM