‘Book Value Review: iToppers Cool Skins For Your MacBook, MacBook Pro, or iBook
Wednesday, July 22, 2009
by Charles W. Moore
Interested in adding a little color to your Apple ‘Book? iToppers are vinyl appliqué skins that adhere to the outer front cover of your MacBook or iBook computer, jazzing up the aesthetics but also adding a modicum of protection from scratches and abrasions as well. Each skin is custom cut to fit the particular MacBook iBook model, including a cutout to display the glowing Apple logo.

iToppers are made from self-adhesive, pressure sensitive vinyl film, and can be user-applied (more on that in a moment.) they are also reasonably easy to remove if you want to revert or to switch to another of the many styles available
iToppers’ graphic skins are designed for one use only. but are priced low enough that changing the look from time to time won’t break your wallet.
If you wish, iToppers will also create a custom graphic skin for your ‘Book from your own photo or graphic image, the cost depending on the computer, image and quantity you specify. Custom iToppers skins can also make an interesting and unique gift. The iToppers folks say Apple recently recommended their product to a music industry firm interested in customized MacBooks for a consumer promotion.
As for stock iToppers designs, there are many to choose from.


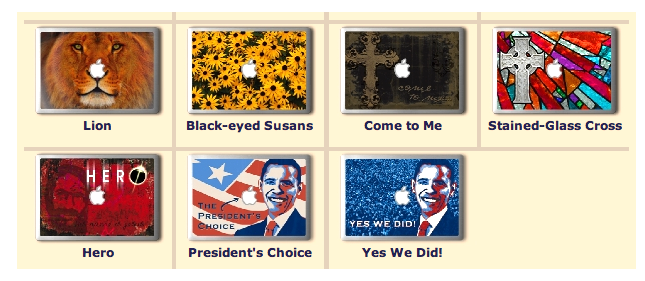
Here’s one I particularly like, entitled “Mac GT,” a Ford GT-40 with the Apple logo shining through the bonnet. Way cool.

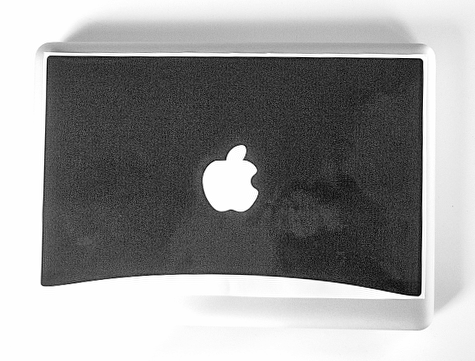
However, our test iToppers skin was the much more subdued and simple Portfolio Black design for unibody MacBook, which sells for a modest $12.95.
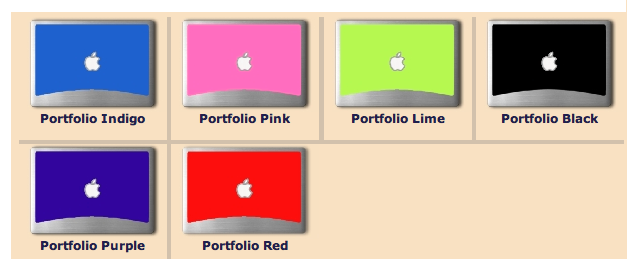
The iToppers Portfolio skins are designed to be reminiscent of the original “clamshell” iBook computer -- a clean and tasteful treatment that enhances your ‘Book and and looks like it came from the factory that way — at least with a careful and successful installation.
Priced at $12.95, these skins are is an economical way to add a colorful identity to your MacBook while protecting it from scratches.
So iToppers laptop skins can be pretty cool in a variety of ways, but as I noted, the trick is in the installation, which is more than a bit challenging, at least if you want it to look good, and you have a one-shot chance to get it right because once the iToppers skin is applied, it can’t be non-destructively (the skin — not the computer) removed or repositioned. There are two recommended methods, each fraught with a particular set of potential pitfalls and problems. This is one instance where it can’t be emphasized too strongly that you need to thoroughly read the instructions, at least twice, and ideally do a step-by-step dry run, before proceeding.
It’s also a good idea to work in a bright, clean area where pets and children won’t distract your concentration on the task or get in the way. The surface of the computer housing must also be scrupulously clean to help facilitate the best chances of success in applying the iTopper graphics. Detailed cleaning suggestions are included in the instructions.
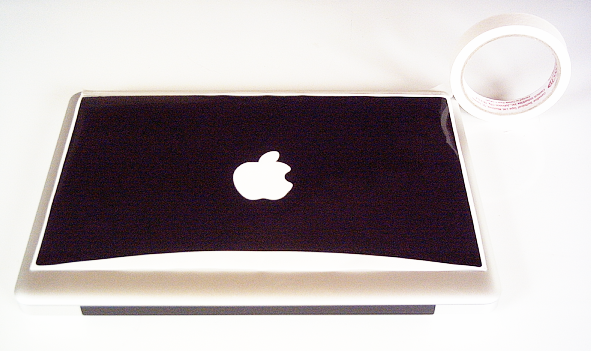
In this shot is the stuff you will need covering both methods.
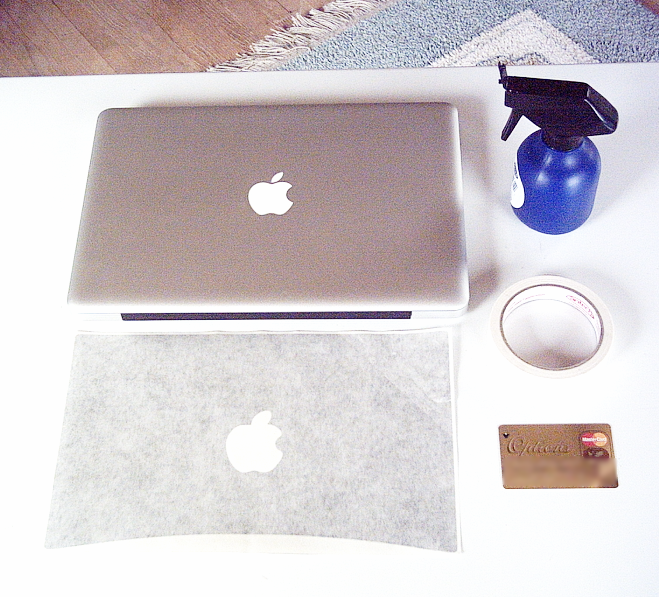
The graphic skin is one piece and ships sandwiched between a top layer of transfer tape and a bottom backing layer.
Wet Method
The wet method results in a more professional application with less likelihood of air bubbles, but requires that you exercise extreme caution to ensure that no moisture gets inside your iBook, which could cause permanent and expensive damage. Water and computers are not a happy combination You will need a small spray bottle or mister filled with mildly soapy water, using just enough dish detergent (one or two small drops per cup of water) to break the surface tension and create minimal sudsing. You’ll also need a credit card or similar plastic card with rounded edges and s supply of paper towels close at hand.
The idea is to wet the top surface of the computer lid with the soapy water to help loosen the backing paper and allow you to adjust the positioning of the graphic appliqué a bit during the installation, but you will still need to position the skin carefully as once it’s taken hold it can’t be moved.
The credit card is used as a squeegee to work air bubbles toward the edges of the skin. The adhesive will dry completely in a couple of days and the graphic will than adhere as if it was installed dry.
Personally, there is no way I’m going to spray water on my MacBook for any reason, and the iToppers instructions are full of dire warnings, some in all-caps bold typeface, about the potential for damage. Too much potential for this cautious individual.
Dry Method
The alternate dry installation method is described euphemistically as “a little more difficult,” with the added caveat that you may notice a few more air bubbles despite your best efforts, but at least there is no danger of shorting out your motherboard or whatever with stray water. For this method you’ll also need a credit card or similar squeegee device.
The prescribed procedure is to apply a strip of masking tape across the top edge of the computer to create a temporary “hinge,” with half the tape be on the transfer paper and half on the computer surface. You then fold the graphic back along the tape “hinge,” removing the backing paper gradually and carefully to revealing the adhesive side of the graphic. The major challenge is to not allow the graphic to freely touch the surface until it is positioned exactly, since once the graphic has contacted the surface you may not be able to move or remove it without damaging the graphic. This is definitely not easy to do.

Using your credit card, you begin “squeegeeing” down about 1
inch along the top edge of the graphic to remove air bubbles (and I assure you there will be some however careful you are with the positioning. Continue “squeegeeing” about 1 inch at a time until the entire graphic is down. the final steps are to remove the transfer tape slowly, pulling it back from the decal, and “if” any air bubbles remain that resist being squeegeed out,you’re advised to carefully pop them with a pin and press the bubble out with your finger to flatten them.
You can download a PDF copy of the iTopper Application Instructions here:
http://www.itoppers.com/downloads/appInstructs.pdf
I found it difficult to pick a rating for iToppers skins. I like the general concept, the eclectic selection of skin themes is great. I would be inclined to give iToppers three and a half out of four stars if those were the only considerations.
However, doing a neat installation of an iToppers skin is way more difficult and painstaking than it should be for a consumer do-it-yourself product, and I find the Wet Method described above just plain scary, so with the installation issues factored in I can give iToppers no more than a two star rating out of four.
iToppers ship to anywhere in the Continental United States, Canada, and outside the United states via USPS, and prices start at $12.95/
There is a money-back guarantee for 30 days from original purchase date against defects in materials and craflsmanship.
iToppers prices:
MacBook $18.95
MacBook Pro 17” $21.95
iBook (both sizes) $18.95 and $19.95
For more information, visit:
http://www.iToppers.com/
Note: Letters to PowerBook Mystique Mailbag may or may not be published at the editor's discretion. Correspondents' email addresses will NOT be published unless the correspondent specifically requests publication. Letters may be edited for length and/or context.
Opinions expressed in postings to PowerBook Mystique MailBag are owned by the respective correspondents and not necessarily shared or endorsed by the Editor and/or PowerBook Central management.
If you would prefer that your message not appear in PowerBook Mystique Mailbag, we would still like to hear from you. Just clearly mark your message "NOT FOR PUBLICATION," and it will not be published.
CM