‘Book Mystique Review - Photoshop Elements 6.0
Wednesday, April 23, 2008
by Charles W. Moore
The gold standard and undisputed paradigm-setter of bitmap image editing programs on the Mac or Windows is the legendary and iconic Adobe Photoshop CS. Big, and incredibly capable, Photoshop CS is a wonderful tool for professionals, but it’s hard to justify its $649.00 cost unless one is using and as a primary facilitator of their livelihood. However, for the rest of us, Adobe has long offered one of the greatest-ever software bargains, a somewhat less powerful , but not in was that the average non-professional user is likely to notice, and still fabulously capable $89.99 “consumer” version of Photoshop called Photoshop Elements.
For editing and correcting digital photographs, I’ve found Photoshop Elements 2.0, 3.0, and 4.0 to be without parallel (discounting Photoshop CS itself) It’s a digital virtual darkroom on my PowerBook without the mess, chemical fumes, and hassle of working in the dark. The fact that it sells for under 100 bucks is amazing. If you’re at all serious about digital photography, you need this application.
However, over the past year or so, Elements 4 has been showing its age a bit, more than a bit really, since it is a PowerPC era program that operates on Intel Macs in Rosetta emulation, and while it’s remained at the top of the heap in consumer image editing software in power and features, would-be challengers like the very attractive, fresh, and universal binary Pixelmator have been nipping at its heels more closely than usual. It didn’t help that Adobe decided to not release a Mac version of Elements 5 at all, while Elements 6 for Windows was released in September, 2007, but they’ve finally reasserted the program’s cred. in the Mac world with the recent release of Photoshop Elements 6 for the Mac, finally a universal binary running natively on MacIntels and raising the bar again substantially with a raft of new and enhanced features while maintaining the same $89.95 price point.
Photoshop Elements is intended to be a complete, end-to-end software solution for anyone doing digital photography, whether they be a consumer amateur or even many a professional. It is designed to offer a user-friendly approach to fixing common photographic flaws and in enhancing digital images by way of a few clicks. The program supports light to middle-advanced photo retouching, color correction, and exposure adjusting, plus the cutting, lasso, clone, blur, sponge, red-eye, spot-healing tools collage-creation, and dozens of built-in effects that can transform images into faux watercolor paintings, sketches, mosaics, ink outlines sepia tones, black & white and more.
One of the shortcomings of Elements 4’s interface from a Mac user’s perspective was that it was generically bland and looked too Windowsy. It’s a lot less bland in Elements 6, which has a new and striking grey appearance theme, but it;s still not especially Mac-like. It appears that the Pixelmator folks have started a trend with their dark (in Pixelmator’s case, translucent black) interface windows and backgrounds motif. PSE6 goes with more of a charcoal dark gray, which I find less aesthetically arresting than Pixelmator’s Darth Vader jet-black, but the more conservative approach Adobe has taken is more functionally practical, and I found its tools easier to distinguish.
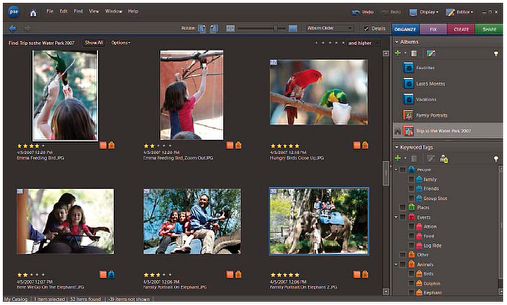
Another interface “feature” I’m less than enchanted with is that the program opens by default in “maximized” view with the Desktop obscured behind a background wall of charcoal gray, whether any image documents are open or not. This screenshot from a Spaces thumbnail illustrates what I mean.

You can “tear down this wall” with a setting in the Preferences, and partly get your Desktop back, although the space-eating palette bin opens every time you start the program. If I find this annoying on a 17” PowerBook display, it must be even more so on smaller displays.
Photoshop Elements 6 has some new features based on Adobe’s proprietary Photomerge technology that let users combine, for example, the best facial expressions and body language from a series of shots to create a single, perfect group shot. A new Quick Selection Tool reduces a once time-consuming select-and-adjust task to a single click, and you can also now combine horizontal or vertical panoramas using Elements 6’s enhanced Photomerge Panorama technology to automatically stitch together multiple photos.
There are now three photo edit modes, each geared toward a different user experience level.
Full…
With Full Edit, you have the flexibility and freedom to explore advanced editing techniques. Full Edit offers tools for correcting color and lighting, fixing image defects, making selections and creating special effects, adding text, and painting on your photos.
Quick…
Quick Edit mode formerly known as Quick Fix) provides a fast, convenient way to enhance your photos. A full range of the most common editing adjustments - including color, contrast, and lighting - are accessible in one spot.
Guided…
New in Elements 6, the Guided Edit mode is an excellent choice if you are looking for more detailed instruction on how to find and tap into the most commonly used editing features. There are also more advanced Guided Edit instructions when you’re ready to learn and do more.
Both Quick and Guided Edit modes support before-and-after preview - a feature not yet included in Photoshop CS3. You can also switch easily from one editing mode to the other.
Other enhancements include an improved conversion tool that converts color images into nuanced black-and-whites.
Customizable layouts let you create scrapbook pages, photo books, greeting cards and burn to CD/DVD, while other sharing options include ordering prints, creating personal online albums for sharing photo creations on the web, printing photos into real U.S. postage stamps, and showcasing creations on a CEIVA Digital Photo Frame.
There’s plenty of new ground to cover with the new Photoshop Elements, evidenced by the application having grown in size from Elements 3’s already portly 55.3 MB and Elements 4’s 88.3 MB to a whopping 267.4MB, so I’m going to concentrate on those things with this review. If you’re not familiar with the good stuff that is returning carried over from Elements 4 and earlier versions, check out my previous review of version 4.0 here:
https://www.macprices.net/columns/hildreth_moore/pse4.shtml
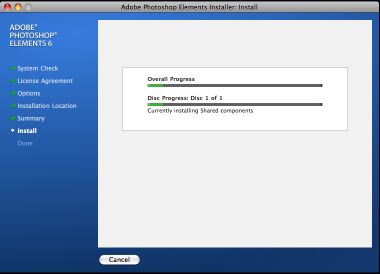
The install and registration process for the beta took me the better part of an hour on my 1.33 GHz G4 PowerBook and poky dialup Internet connection. I’m sure it wouldn’t take nearly that long on a MacIntel machine because as noted previously version 6, PSE is finally a Universal Binary application and over a broadband connection registration should go substantially quicker. I also suspect that the installation may be streamlined somewhat in the final, commercial release. You are also obliged to shut down any running browsers. The good news is that everything went smoothly with no hassles or glitches, and Photoshop Elements 6 eventually opened in its new interface glory.
I didn’t do any formal timing comparisons, but PSE6 seems to start a bit more quickly than PSE4 does, although it’s still far from instantaneous, at least on my middle-aged G4 box. Reportedly it only takes a few seconds to start up on Intel Macs.
Once it’s installed and registered, and startup is complete, Elements 6’s new Welcome screen appears offering the options of starting a project from scratch, browsing with Adobe Bridge (see below), importing pictures from your digital camera or scanner, or opening a recently viewed image.
Photoshop Elements 6’s marquee new feature is support for The Bridge, which lets you find your photos, view them as thumbnails or previews, and open them without leaving Elements
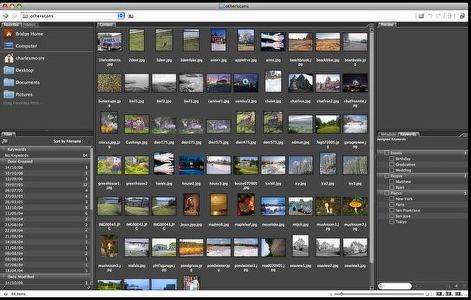
The new Bridge CS3 helper application (previously only available with Adobe Creative Suite applications) lets you browse through your hard drive to locate the photos you want to open and manipulate. It also lets you export photos from iPhoto.
The Bridge has several panels that help you find and preview your photos, review associated metadata, and so forth. You can use any of the pre-defined arrangements of these panels - called Workspaces - by clicking the numbered Workspace buttons in the lower right hand corner of Bridge, or create your own custom Workspace by hiding the panels you don’t use.
Another Bridge feature, called “Stacks,” lets you dispense with iPhoto and organize your photos into stacks of images. Stacks let you keep each series of photos in a single spot in Adobe Bridge for Photoshop Elements, making it easier and faster to find the
photos you want, since stacks reduce unwanted clutter.

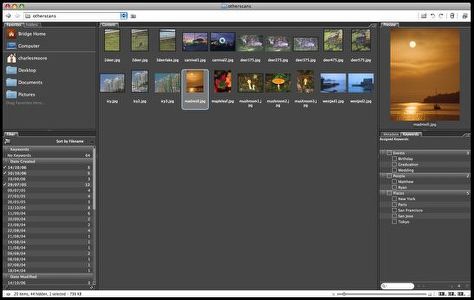
Bridge Keywords are words that help you categorize and find photos in ever-growing photo libraries. You can use the Keywords panel, located on the right side of Bridge (in the default Workspace layout), to easily add keywords that represent favorite people, places, or events, and assign them to photos. You can instantly view every photo taken of a person, place, or event by simply filtering on one or more keywords.
You can also employ a feature called Collections, which lets you save groups of favorite photos as as a Collection for quick access and viewing, o to gather together photos you want to use in a project. An example of how you might use Collections would be if you have several cameras, you can segregate your library based on the camera you used to capture your shots.
However, you don’t have to use, or even start up the Bridge in order to use Elements 6, and if you prefer to store and organize your images in iPhoto or even in a Finder folder, you can continue to do so. You can set Elements as your Mac’s default photo-editing program in iPhoto’s General Preferences tab.
Photomerge and Panorama
Photoshop Elements 6 has some new features based on Adobe’s proprietary Photomerge technology that let users combine, for example, the best facial expressions and body language from a series of shots to create a single, perfect group shot. A new Quick Selection Tool reduces a once time-consuming select-and-adjust task to a single click, and you can also now combine horizontal or vertical panoramas using Elements 6’s enhanced Photomerge Panorama technology to automatically stitch together multiple photos.
Almost every photographer must have experienced the frustration of snapping a great group shot, except that somebody has their eyes closed, their tongue out., isn’t smiling, or looked away from the camera at the moment of exposure. When that happens, a new Elements 6 feature called “Photomerge Group Shot” can save the day. Photomerge Group Shot lets you create or “fix” perfect group shots in which everyone looks their best by choosing one photo as your master image and then, using the highlighter tool, marking areas in other photos you wish to merge with the master.
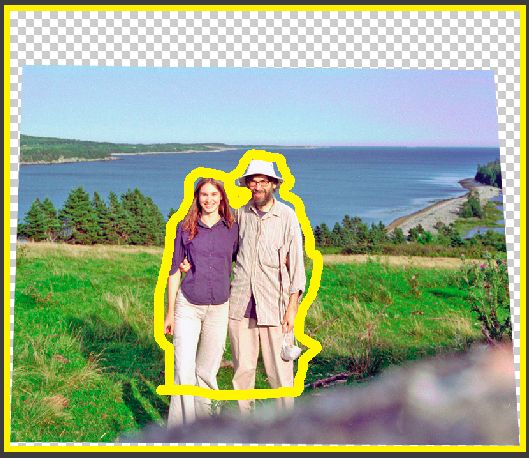
Photoshop Elements 6 has some new features based on Adobe’s proprietary Photomerge technology that let users combine, for example, the best facial expressions and body language from a series of shots to create a single, perfect group shot.
This feature really works best with a series of photos that are quite similar in composition taken from the same point, which this example is not, being composed from two photos taken in different locations and not quite believable, but I didn’t have any ideal sequences of group shots in my archives, and this does show what the program is capable of.

Another Photomerge feature, “Panorama,” stitches together multiple photos panned across a scene into a single seamless panorama - automatically. In Photoshop Elements 6, the Photomerge Panorama is enhanced, making it easier than ever to blend together your favorite landscape shots, featuring new detection and blending algorithms, so you have the choice of four completely automated ways to create seamless panoramas that don’t require any manual adjustments or fine tuning.
For an example, I started with these two shots of the lake my house is situated on (although you don’t have to limit yourself to two).
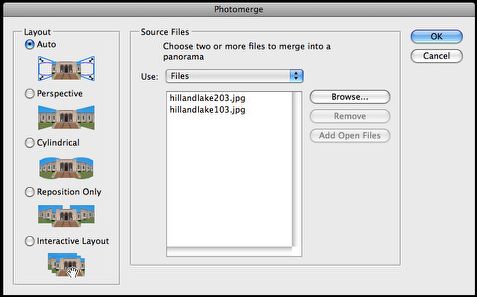
Either choose File > New > Photomerge Panorama if you’re in Photoshop Elements, or if you’re starting from the Bridge, it’s Tools > Photoshop Elements > Photomerge Panorama.
PSE6panoshots.jpg
I used the Photomerge dialog Elements 6 to select the two source jpgs from the Finder, and chose “Auto” as the panorama mode I wanted to use, then hit OK and let the Elements magic do its stuff.
It took a minute or so on my old G4 PowerBook (would be much faster on a MacIntel), and the routine eventually produced this composite image.
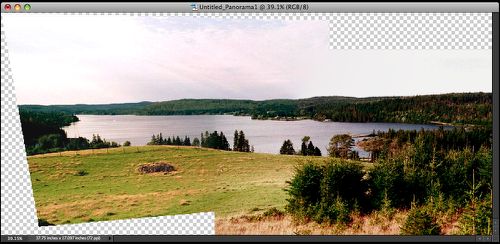
Pretty amazing, I think, - almost magical, and that’s just a basic simple merge of two photos. Photomerge Panorama offers an array of tools and effects you can use to manipulate your panorama.
I then cropped out the largest possible rectangular composition from the merged image, and voila! You really can’t detect that it’s a composite shot.

For some perspective on just how cool and time-saving this is, here’s the best I could manage manually merging the same two photos using Color It! 4.5 last year. Elements 6 even did a much nicer job of rendering the sky in the automatically merged panorama.

Elements 6 even did a much nicer job of rendering the sky in the automatically merged panorama.
Black and White Photography
I love black and white photos. Back in the ‘70s, I spent a lot of hours in darkrooms, and even had my own makeshift one set up in a spare bedroom for a while. In terms of creativity and artfulness, I prefer black and white to color, and of course the master of b&w art was the great Ansel Adams who has inspired millions with his breathtaking black and white landscape photography of the American West and South
during the mid-20th century, mostly using 6” x 10” negative view cameras with much of the creative process done in the darkroom.
While it doesn’t offer the same level of control as a real darkroom, using Photoshop Elements and a digital camera you certainly can create black and white photographic art. Most bitmap graphics applications can convert colored or grayscale images to black & white, but Elements 6 takes you well beyond basic desaturation to deliver an interactive workspace for creating black and white photos without the need of working in the dark or with trays of smelly chemicals, having to wash and dry prints, and so forth.
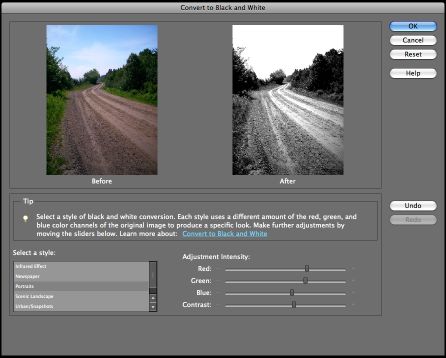
PSE 6’s Convert To Black And White command makes the conversion process quick, easy and even fun by letting you choose a specific conversion result, unlike the Remove Color command, which automatically converts to black and white for you.
In the Convert To Black And White dialog box, you compare and choose different conversion presets represented by image styles. Select a style and then use the available sliders to fine-tune the conversion with adjustments reading out in real time.
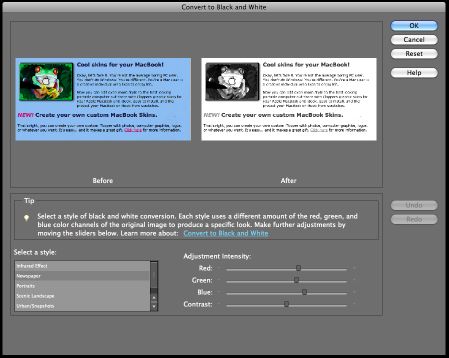
You can move the Red, Green, and Blue sliders, as well as the Contrast slider, to suit your preferences - subtle adjustments are all that is needed here. Use the Before and After images to see the dramatic results your changes produce. The interesting thing for many users is how much you can change the look and character of a black & white photo using color adjustments, although this is familiar old hat to us grizzled veterans of film photography with our collections of colored lens filters for b&w work, for example red filters to create dramatic sky effects.
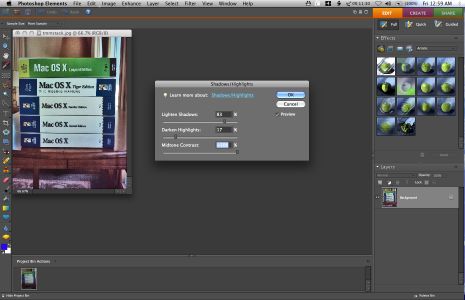
Adjust Color Curves
From time to time, you will have photos that need several adjustments in order to bring out the true color or contrast that you desire. Professional photographers use a “Curve” from Photoshop to guide them with their adjustments. Photoshop Elements now supports curve adjustments.
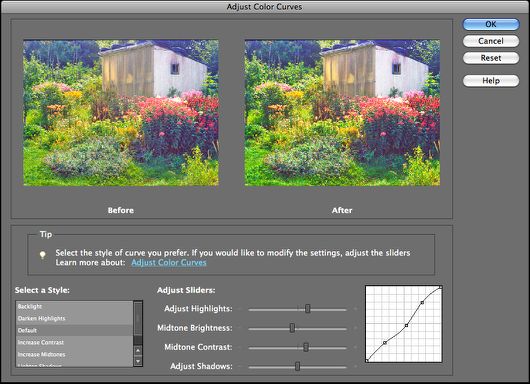
With the Adjust Color Curves command, you can adjust Highlights, Midtone Brightness, Midtone Contrast, and Shadows using sliders that make the color curve to change, with the changes applied in the preview in real time.
Remove Color Cast
Another handy feature that has been enhanced in PSE 6 is color cast removal. Here’s and example of what it can do.

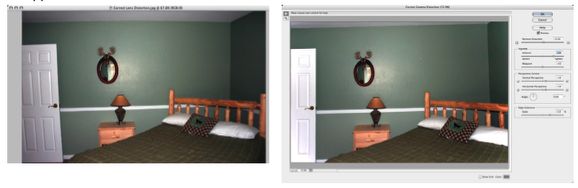
Correct Camera Lens Distortion Correction
Even shots taken with the most expensive DSLR cameras can be subject distortion caused by the curvature of the camera lens or the angle of your position when you took the photo, both of which can make an image of what should be a straight line appear to bend. Photoshop Elements 6 brings all distortion correction adjustments into a single, dedicated place, found in the Filter > Correct Camera Distortion menu. If your photo also has darkened corners attributable to lens curvature (common with wide-angle lenses), PSE 6’s Vignette controls can help you gradually lighten or darken corners until they match the lighting across the remainder of the shot.
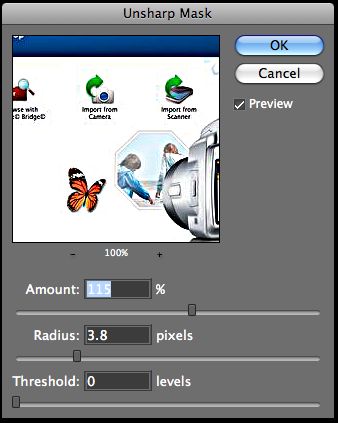
Sharpen Blurred Edges
Photoshop Elements 6 has new, easy to use Adjust Sharpness controls for sharpening up blurred images. By the way, the Unsharp Mask command has been moved from the Filter menu to the Enhance menu, which may be a bit confusing the first time you look for it,
Integrated Raw Support
The ability to take camera “raw” formatted photos ( a rough analogy is “digital negatives”) is becoming popular, as even a fair few consumer digital still cameras now support raw. Photoshop Elements 6 extends support for newer raw formats and supports more cameras than ever before while offering more controls like Vibrance and Clarity to give you a wider range of fine-tuned adjustments. PSE 6 also makes it easier than ever to apply conversions to multiple photos at once. Just open them all, select multiple images in the new filmstrip, and make your adjustments.
Some more advanced editing tools making the crossover from Photoshop CS to Elements for the first time in version 6 include the Quick Selection Tool which you can use to “paint” selections onto an object, and the Refine Edge dialog with which you can preview selection feathering, plus smooth, contract, and expand selections.
Create A Slide Show
Photoshop Elements lets you create great looking PDF slide shows that can be shared via e-mail, and you can also use Elements 6 to create a Web photo gallery.
Perhaps it shows here that I really love Photoshop Elements. It's not perfect by a long shot, and I don't love the un-Mac like and in many ways clunky Userinterface or the sometimes gratuitous-seeming complexity and counter-intuitiveness. Adobe's engineers could profitably study more about Pixelmator in the interface department than its color theme. However, I love what this program can do, and if there's another graphics program thatt comes even close to offering as much raw image-editing power and versatility for 90 bucks, I can;t imagine what it would be.
So, recommendations. If you have a Power PC Mac and are already using Photoshop Elements 4, I would suggest pondering the pros and cons a bit before upgrading to PSE 6. While the new features in version 6 are kinda cool, they’re hardly must-haves for most of us. Basic editing and corrections functions work with tolerable although often a bit sluggish dispatch on my 1.33 GHz G4 machine, but more advanced image manipulation like PhotoMerge proceeds with the speed of the proverbial cold molasses running uphill in January. Well, maybe not quite that bad, but it’s certainly patience-challenging. On the other hand if you have an Intel Mac - any Intel Mac - switching to Elements 6 is a no-brainer. Don’t hesitate for a moment. The performance improvement will be radical.
New In Elements 6 for Macintosh
• Streamlined interface
• Guided editing
• New and enhanced compositing
• Quick Selection Tool
• Color Curves Adjustment
• Batch RAW editing
• Support for RAW formats from newer digital cameras
• Black & White Conversions
• Lens Distortion Correction
• Flexible layouts for scrapbook pages, photo books, greeting cards, CD/DVD labels
• Backgrounds, frames, clip art & effects
• PowerPC G4 or G5 or multicore Intel processor
• Mac OS X v.10.4.8 - 10.5
• 512MB of RAM (1 GB recommended)
• 64MB of video RAM
• 1 GB of available hard-disk space (additional free space required during installation)
• 1,024x768 minimum display resolution with 16-bit video card
• DVD-ROM drive
• QuickTime 7 software required for multimedia features
• Internet connection required for internet-based services
System support:
The software is a Universal Binary application that will run natively on PowerPC and new Intel-based Macintosh systems.
Estimated street price is US$89.99 ($69.99 upgrade), which I consider one of the biggest bargains in the commercial software market, considering that PSE continues to pack in most of the power and features of the professional standard Photoshop CS that I would ever use a small fraction of the full-featured Photoshop’s price.
Photoshop Elements 6 is immediately available in the United States and Canada for an estimated street price of US$89.99. Owners of previous versions of Photoshop Elements can upgrade to Photoshop Elements 6 for US$69.99 with an in-box, mail-in rebate or through:
http://www.adobe.com
The software is available at Amazon.com, or from one of the following retailers: Apple Stores, Apple.com, Best Buy Stores, BestBuy.com, Costco.com, J&R, Microcenter, NewEgg.com, Staples Stores and Staples.com. Information about other language versions, as well as pricing, upgrade and support policies for other countries is available on:
http://www.adobe.com/go/photoshopelmac
For more information, visit:
http://www.adobe.com
Note: Letters to PowerBook Mystique Mailbag may or may not be published at the editor's discretion. Correspondents' email addresses will NOT be published unless the correspondent specifically requests publication. Letters may be edited for length and/or context.
Opinions expressed in postings to PowerBook Mystique MailBag are owned by the respective correspondents and not necessarily shared or endorsed by the Editor and/or PowerBook Central management.
If you would prefer that your message not appear in PowerBook Mystique Mailbag, we would still like to hear from you. Just clearly mark your message "NOT FOR PUBLICATION," and it will not be published.
CM