PowerBook Mystique Review - Drive Genius 1.1 Disk Maintenance, Optimization And Repair Tool Suite
by Charles W. Moore
If you're serious about keeping your 'Book's hard drive in optimum trim and being able to do efficient, effective troubleshooting and repairs when necessary, you need good disk maintenance and repair software. For many years, Symantec's Norton Utilities and SystemWorks have been the dominant players in this category, bit last year, Symantec announced that further development of Norton Utilities and its SystemWorks suite of companion disk and system tool applications will be terminated at the time OS 10.3 is replaced by OS 10.4 Tiger, which is now less than two weeks away. The Panther version will continue to be supported for the foreseeable future.
This was big news. Like many Mac veterans, I've been using Norton Utilities almost as long as I've been using Macs, although I have to admit not nearly as much lately as in the past, partly because recent versions of the Mac OS -- both Classic and X, have been a lot less likely to suffer directory damage in crashes and so forth than back in the old System 7/OS 8 era, and partly because Disk Doctor's reputation has been kind of spotty of late.
The newest edition of Norton that I have installed is Classic version 6.0. The scuttlebutt about OS X versions of Norton has not been very encouraging, and the program suite has become much more complex, bloated, and Windows-like (development of the Windows version of Norton will be continued), with the installer scattering files here and there around the hard drive.
One might speculate that Norton's demise as king of the hill in Mac disk maintenance software really began about six years ago with the introduction of AlSoft's Disk Warrior, which is a one-trick focused exclusively on directory diagnosis and rebuilds, but DW is almost universally regarded as the disk utility to have if you're only having one. Or actually two, since everyone also has Apple's own Disk First Aid/Disk Utility application, which is better now in OS X than it has ever been. OS X users can also utilize the fsck -y UNIX command to run a disk diagnostic and repair routine from the Console or started up in single user mode.
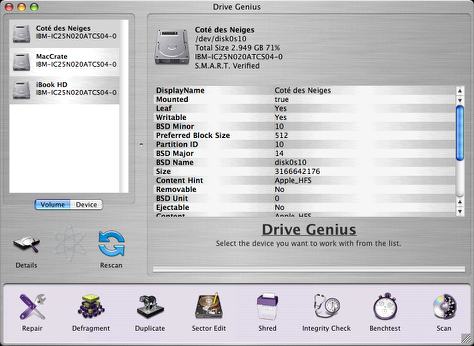
For those who want a more comprehensive bag of disk maintenance, diagnostic, and repair tools, the new kid on the block is Prosoft's Drive Genius, which incorporates and expands on the feature sets of several Mac OS utilities developed by New Zealand-based SubRosaSoft, particularly Disk Guardian (which Drive Genius replaces), the VolumeWorks partitioning tool, and others.
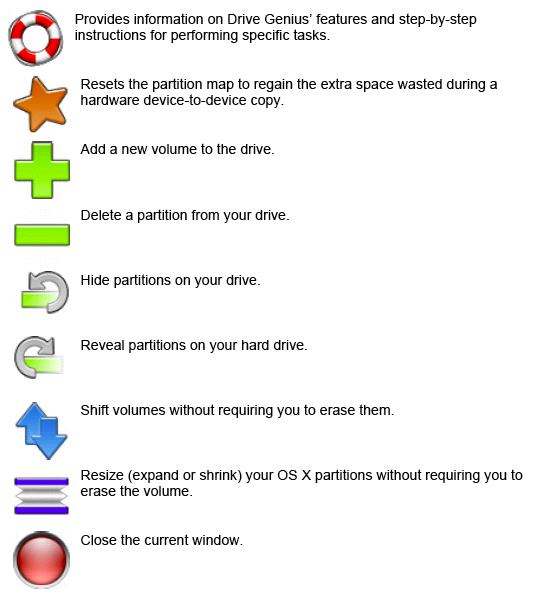
With Drive Genius you can optimize drive performance, protect data, defragment a volume, analyze a volume and repair it if necessary, and execute other tasks like media surface scanning, measuring the throughput of drives to see if they are performing up to par, and long term data integrity checking. Drive Genius's repartitioning feature enables you to resize your drive without erasing and reformatting, and can be used to add, initialize and delete partitions. Additionally, Drive Genius can do volume and device copying, and is is able to hide partitions from most users, to move a partition on the hard drive, and even has a sector editing function to edit the data on any sector of the drive, while its shredding feature can erase drives securely per the Department of Defense’s standard.
Drive Genius has comprehensive hardware support including ATA, SCSI, Firewire and USB drives, and includes bootable CD-ROM support for OS X capable machines ranging from first generation iMacs to the latest PowerBooks.
Prosoft recently released DriveGenius 1.1, which addresses several issues that cropped up in the initial release.
New in Version 1.1
• Updated internal manual.
• Additional checking before volume duplication.
• New free space shredding feature.
• Attach Disk Image feature allows mounting of disk images while booted from CD.
• New bootable CD support latest machines.
The program's user interface appearance is similar to SubRosaSoft's Disk Guardian — heavy on the "brushed metal," which does not particularly suit my aesthetic taste, but it is clean and functional.
Most Drive Genius functions require a fairly intuitive three-step process to complete a task:
1. Select a hard drive or volume in the main window.
2. Select an operation.
3. Select a parameter and apply it to the drive or volume.
For operations such as copying, partition resizing and sector editing, you need to enter additional information pertaining to the operation. Shredding, get details, benchtest, integrity testing and initialize don’t require any additional information. Once you enter the parameters for the operation, click the Drive Genius icon to complete the task.
Prosoft sensibly recommends backing up your data before using many of the features in Drive Genius; that way, if anything goes wrong (virus, power blackout, OS error or hardware failure etc…), you will be able to recover your data.
In a nutshell, here's what Drive Genius has to offer:
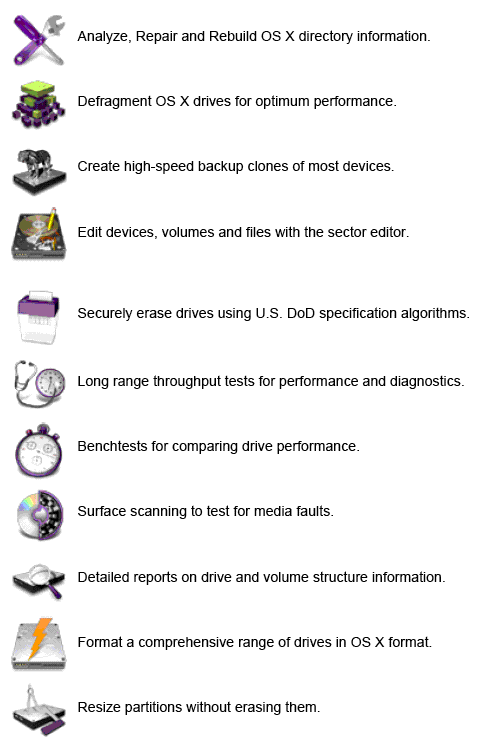
Maintenance Tools
• Duplicate - Volume or entire drive cloning.
• Integrity Check - Find problems before they find you with these comprehensive hardware verification tests
• Repair - Fx corruption on OS X volume structures to get your damaged drive up and running again.
• Rebuild - Rebuild and replace OS X volume structures to regain access to files that have become lost or hidden
• Verify - Check OS X volume structures for possible corruption
• Fix Permissions - Reset OS X boot volume permissions to improve application performance and compatibility
• SMART Status - Read and display SMART diagnostic codes from your hard drive to avoid dangerous hardware failures
Optimization Tools
• Defragment - Improve drive speed and efficiency by optimizing your OS X volumes
• Benchtest - Make sure your hard drive performance is what it should be with comprehensive speed tests and graphical comparisons to other common configurations
• Surface Scan - Verify your hard drive’s reliability with a complete suite of non-destructive read verification tests for any drive or OS X volume
• Sector Editor - Fine tune all aspects of your system with direct, advanced byte viewing and editing of all data on your drives, volumes and files (recommended for expert users only)
Management Tools
• Partition - Add, delete, hide, expand or shrink OS X partitions so you can organize your data more efficiently
• Shred - DoD compliant (5220.22 - m) secure erase. Removes all traces of data from free space and deleted files on any device or OS X volume
• Details - In-depth report of specifications and space utilization of all devices and OS X volumes
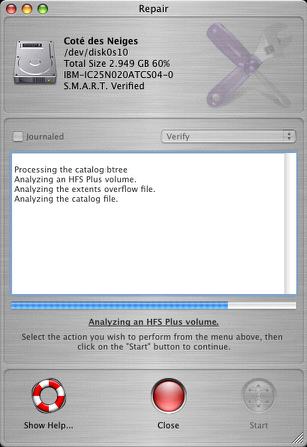
To Verify or Repair a volume, the core function in drive maintenance software, select from the popup menu whether you want to verify, repair, rebuild the volume, or repair permissions.
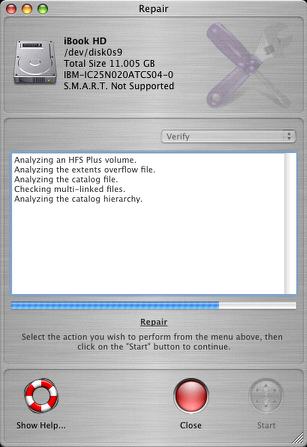
One aspect I find frustrating about Drive Genius is that it requires the volume on which you are running a process to be demounted, so you can't even run a verification check on the disk you're booted from. SubRosaSoft's Disk Guardian (and Norton Disk Doctor) will happily verify the directory of your boot disk, and will run a repair routine as well, although a dialog appears suggesting that it would be better to boot from another disk first. Nevertheless I've found that a couple of passes with either application usually does the trick without rebooting to another volume, restoring "appears to be OK" status with a minimum of delay or hassle.
With Drive Genius, however, you will unfortunately have to either boot from another volume or the Drive Genius CD even to do a simple directory verification. I hate booting from CDs. Starting up takes forever, and when Drive Genius finally appears, you are obliged enter the very long serial number before the program will run. Having DriveGenius loaded up and registration key configured on a bootable external FireWire or USB 2 drive is a much preferable solution. I just wish they would let the verification/repair routine take a shot at fixing the boot volume.
Note that Apple's journal file system keeps a log of the hard drive's main data activity. In the case of a crash or other system failure, the file system can retrieve lost data by consulting the "journal" log, restoring the system to its previous state instead of having to go through the lengthy process of rebuilding it. The downside is that enabling Journaling can slow drive access time down by up to 10% — an issue of particular concern to us laptop (or Mac mini) users, whose drives are on the poky side already. In certain instances nevertheless, Journaling can be preferable in situations where data stability is more important than drive access speed. Personally, I prefer to keep it turned off on my 'Books. DriveGenius lets you conveniently turn Journaling on and off. In the volume view, select a mounted volume you want journaling to be turned on/off. Click the icon on the bottom of the window. From the Repair window, check or uncheck the Journaled check box to turn journaling on or off.
Repartitioning
The ability to repartition a hard drive without erasing and reinitializing it is a function that is not available in either Norton SystemWorks or Disk Guardian. However, DriveGenius incorporates the capability of SubRosaSoft's VolumeWorks repartitioning application in its comprehensive package of features.
Drive Genius Repartition enables you to resize and manage partitions (volumes) on your hard drives, allowing you to expand or shrink partitions without erasing them. You can use the Repartition feature to create and delete partitions. Drive Genius also includes custom icons that can be automatically applied to your newly created partition. The Repartition feature can hide partitions from users as well, and has the ability to shift a partition on the hard drive in addition to reconstructing partition maps.
Note that DG Repartition is designed to work with OS X partitions. Using it on OS 9 volume may remove the ability to boot OS 9 from that partition. It does not affect the data on OS 9 volumes.
Partitions can be moved forwards and backwards on the hard disk allowing you to combine free spaces into one. When you shift a partition, the partition’s data is unaffected.
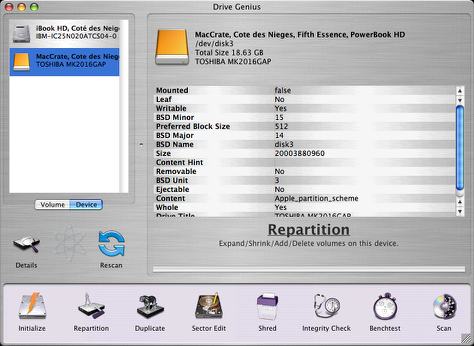
There are four key areas in the main window:
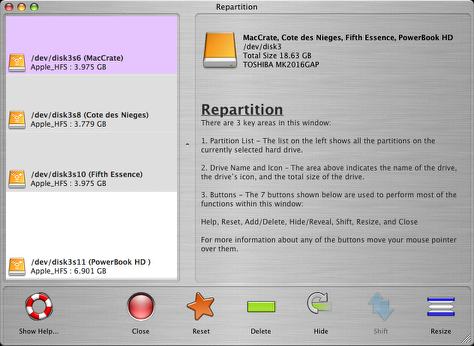
Partition List - the list on the left hand side of the screen shows all the partitions on the currently selected hard drive. The partition list will also show hidden partitions and partitions with file systems not supported by the OS.
Drive Name and Icon - the upper right hand corner indicates the name of the drive, the drive’s icon and the total size of the drive.
Context-sensitive help - provides help and descriptions of the current active screen and the icon buttons.

Once you select the volume or partition to work on, you can select a task you want to perform by clicking on one of the icon buttons on the toolbar at the bottom of the window. For operations such as adding, resizing, and shifting partitions, you will need to enter additional information pertain to the operation. Click the Reset, Delete, Hide, and Resize to select the appropriate function.
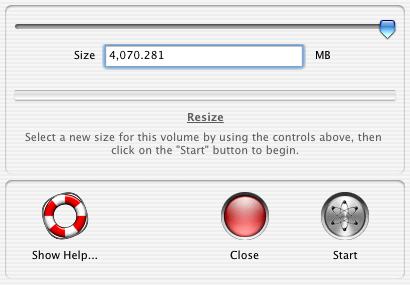
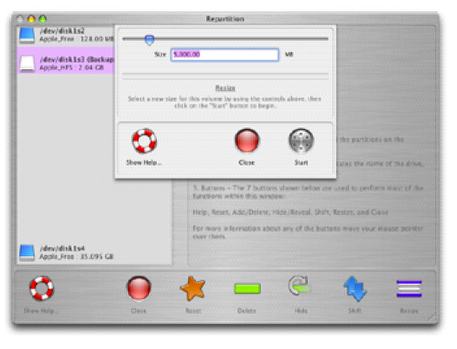
For example, to resize a partition, Click the Resize button, and use the slider in the dialog that appears to select the desired new size of your partition and press Start to continue. You can also type in the new size of the partition. You can't make a volume smaller unless it has unused apace. I tested making one of the partitions on my 20 GB drive a bit smaller, since the drive had no unpartitioned free space. In order to shrink that partition the data it contained needed to be defragmented (see below).
To expand a volume, select the hard drive you want to work on, click on the Resize icon button, and use the slider to select the new size of your partition and click Start to continue. You will need to have free space below the volume you want to expand. You cannot expand a volume if there is no free space adjacent to it. If the free space partition is on top of the volume you want to expand, you will need to use the Shift function to move the volume up before expanding the volume.
Partitions can also be moved forwards and backwards on the hard disk allowing you to combine free spaces into one. When you shift a partition, the partition’s data is unaffected. The free space adjacent to the partition will determine how far forward or backward you can move the partition. If there is no free space adjacent to it, the partition cannot be moved. Additionally, you cannot move an Apple_Free partition.
After I got through experimenting with shrinking volumes, I had two inconvenient small sections of free space left. Using the Shift and Expand volume functions, I was able to successfully reclaim the space.
DriveGenius also allows you to create or delete a volume from your hard drive. The Delete operation deletes a volume and destroys all its data. This partition will then be marked as "free space" until you create a new volume or expand an existing volume to take over it.
You can use VolumeWorks to hide and reveal volumes on your hard drive. The Hide operation allows you secure volumes against unwanted user access. Hidden volumes will not be visible under normal circumstances and will not mount automatically. The hidden mode is designed as a simple/convenient way to hide your data from prying eyes.
Defragmenting
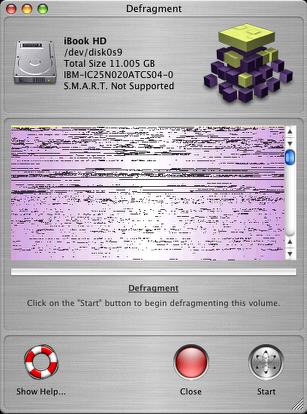
Adding and deleting files to and from your hard drive will gradually cause your hard drive to become more and more fragmented. When the OS writes files to the drive, it looks for empty spaces in which to write data. If the space is too small to fit the file, it will write part of the data in one area and the remaining to another area. Consequently, while overall disk space is wasted, drive access will gradually slow down, as the read/write head has to scan multiple parts of the drive to locate and read a file. Defragmenting your hard drive from time to time can boost the performance of your computer by putting all of these broken up pieces into one continuous block with all of the empty space at the end. Many Mac users are familiar with Symantec's Speed Disk defragmentation tool. The DriveGenius Defragmenting module works fairly similarly to Speed Disk.
To defrag your drive with DriveGenius, you select the Volume you want to defragment by highlighting it. once the volume integrity is successfully verified, the defrag process can begin.
The screen shows the fragmentation of the volume:
• The yellow portion represents the data has already been defragmented.
• The lavender portion represents file that hasn’t been moved yet.
• The black portion represents the free space.
Here's what the fragmentation map of the 11 GB main partition on my iBook's 20 GB hard drive looked like at the start of the process.
Drive Genius gives you a running readout of what is happening as the defragmentation proceeds. It is not a quick process, especially on an OS X boot volume with all those tens of thousands of tiny files (files 173,643; Folders: 33,485 in this case).
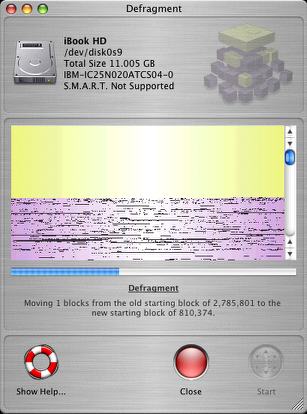
The program had to reorganize roughly 2.5 million blocks of data on the partition, which took about six hours. ProSoft warns that it can take from half an hour to a day to defrag a high capacity drive (depending on how fragmented it is). I expect that it would go more quickly and on a machine with a faster processor and/or hard drive. The process was happy to run in the background, and I was able to continue working with the computer and even go online.
Here's the finished job:
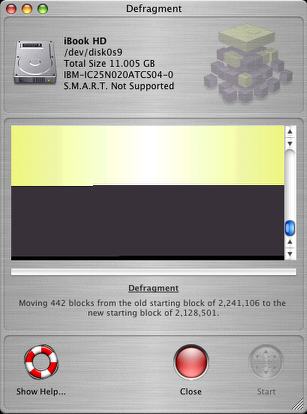
Worth the effort? Apple has posted a Knowledge Base article on Disk Optimization And Fragmentation With Mac OS X, which is worth a read before making any defragging decisions.
However, after defragging my iBook's drive, performance did seem zippier, with less hard disk accessing time. It's not something I wouldn't be inclined to use a lot, but it's a nice tool to have in your disk maintenance tool kit.
Duplicate
The Drive Genius Duplicate function, which appears to be based on SubRosaSoft’s CopyCat, copies all the information from the source drive to the destination drive. A copy of the source drive is made to the destination, so if you backup your startup drive, a bootable copy of it is created, with all information such as file permissions preserved.

Unlike some backup programs which copy file-by-file, Drive Genius utilizes a method called device copy. Using device copy enables you to retain every detail of the original drive, from bootablity to the icon locations. Device copy is also a lot faster than the traditional file-by-file backup.
Drive Genius also supports duplication of drives and volumes. For drive copy, Drive Genius will duplicate an identical copy of the drive. For volume copy, an identical volume is first duplicated, and then Drive Genius will apply a proprietary resizing technology to expand the volume size to the maximum, so no space is wasted. Duplication can be to another drive or to a disk image file.
To Duplicate your volume, launch Drive Genius or boot from the Drive Genius CD. In the Drive Genius Volume window, select the volume you want to backup. The information on the target drive will be replaced with the information on the source volume. If you want to archive to a file instead then select “New Disk Image” as the target.
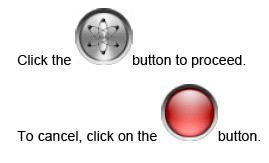
To Duplicate a device, launch Drive Genius or boot from the Drive Genius CD. In the Drive Genius Device’s window, select the device you want to clone. Select the target device from the pop-up menu. Click the button to proceed.
To cancel, click on the button. Drive Genius requires the source and the target devices to be unmounted before proceeding with the duplication. You will need a Drive Genius bootable CD or start up from another drive.
Information on the target drive will be replaced with the information on the source volume. If you want to archive to a file instead then select “New Disk Image” as the target. Using Drive Genius on an OS 9 only volume may remove the ability to start up OS 9 from that partition, but Drive Genius does not affect the data on OS 9 volumes at all. Drive Genius’ device copy will work with almost all file systems including OS 9, Linux and Windows. Drive Genius can only duplicate HFS+ volumes with Volume Duplicate. Almost all formats can be duplicated using Device Duplicate.
Sector Edit
Drive Genius’ Sector Edit allows expert users the ability to access and modify bits and bytes of a volume or a disk. It is strongly suggested that you not use this function unless you are extremely proficient with raw hex data, which I am emphatically not. Editing the data using Sector Edit may render your data files unreadable, or even corrupt your drive.
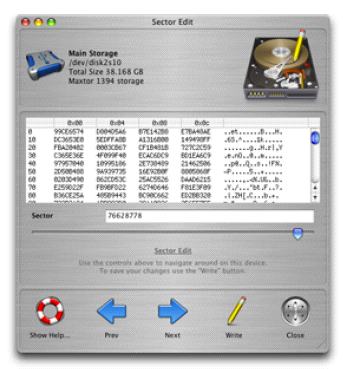
To perform a low level Sector Edit on your drive, in the Drive Genius Volume window, select the volume you want to perform a sector edit. You can also perform sector edit on a device by selecting a drive under device view. You can use the sector edit window on any file by using the file menu to open a document.
I did not try this feature. See the Drive Genius documentation for full details.
Shred
Drive Genius' Shred function may be used for securely erasing the contents of a volume or the whole drive. Reasons to perform a shredding operation instead of simply dragging the files into the trash and emptying it might include:
• To avoid identity theft and protect your credit.
• Stop intellectual property theft.
• Permanently get rid of your data files so no one can recover it.
• Most Government/large corporations require the drives to be securely
erased before disposing or transferring to other users.
The only secure way to erase your drive is by writing repeated passes of various data patterns. Shred overwrites the volume or the drive with three passes and ensures all previous data will never be recoverable. Drive Genius’s Shredder function conforms to the U.S. Department of Defense standard for drive sanitization (DoD 5220.22 M), and it works with IDE (ATA), SCSI, USB, and Firewire hard drives. The current version of Shredder does not support RAID drives.
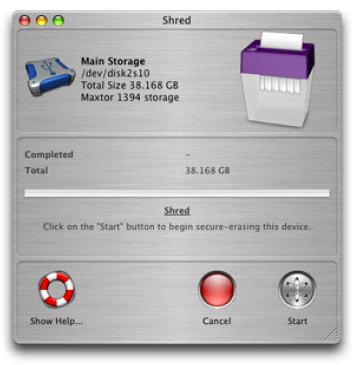
Drive Genius can shred either a volume or the whole drive. If you are shredding your boot volume or your startup drive, you will need to boot the system from the Drive Genius CD, or boot of from another drive with Drive Genius installed.
Integrity Test
Drive Genius's Integrity Test is a suite of diagnostics designed to test the overall integrity of the drive by writing and reading various block sizes to and from the drive. Integrity Test measures and reports various aspects of the drive subsystem including the driver, the drive controller, the cabling, the drive’s motherboard and the head seek mechanism.
The transfer size ranges from 2 KB to 16 MB. For setup such as mail server or accounting server, test the drive at 2 KB block. Database servers do lots of little searches and hardly ever read lots at a time so small blocks are a good test. Use a bigger block size if you use the drive for graphic intensive application and digital audio and video applications.
The length of test can be varied from one minute to one day. The longer the duration given to the test, the more reliable the results are. Start with smaller time frames and give it a longer period to detect more subtle flaws.
Benchtest
Drive Genius Benchtest is a tool, similar to Disk Guardian's eponymous feature, to test the performance of different drivers, CPU’s, operating systems, and data-transfer efficiency of large and small volumes. For example, digital video users can use Benchtest to see how differing custom driver and mode page settings affect the efficiency of video capture and web server administrator can find out how the volume performs under small file transactions.
Benchtest reports the results in either graphical or numeric formats. You can export the results as high quality images, or save them as files. You can also import files that others have saved and Drive Genius comes with a set of them from most current Macintosh systems. You can select these for a live on-screen comparison between your system and others.
Benchtest will perform the following tests on the drive selected:
• Sequential read test measures how many times single-block reads can
be performed in one second. This test is affected by read caching (the larger the read cache, the faster
the performance).
• Sequential write test measures how many times single-block writes can be performed in 1 second. This test is affected by write caching (the larger the write cache, the faster the performance).
• Random read test measures drive performance for reads of blocks of
data from 2 kilobytes to 16 megabytes. For small block sizes, seek time and rotational latency are weighted more heavily. For large block sizes, the transfer rate is weighted more heavily.
• Random write test measures drive performance for writes of blocks of
data from 2 kilobytes to 16 megabytes. For small block sizes, seek time and rotational latency are weighted more heavily. For large block sizes, the transfer rate is weighted more heavily.
Depending on the speed of the drive and the CPU, it may take up to ten minutes to finish the test. The test data is updated as soon as each task is completed. A status bar marks the progress of the test. You can click on the Red button to stop and exit from a test in progress. It may take a few seconds before the test is cancelled. Depending on the display option you selected, the final result can be in the form of a bar chart, line graph or formatted text.
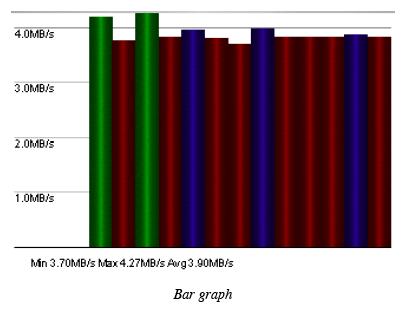
Bar graph - Draws a bar graph comparing your drive with your choice of a comparison drive.
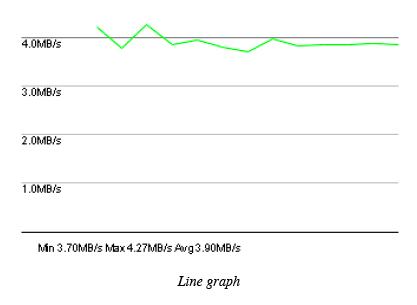
Line graph - Draws a line graph comparing your drive with your choice of a comparison drive.
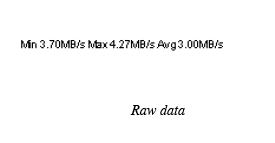
Raw data -- Displays the numerical figures rather than representing the information graphically.
Scan
Drive Genius Scan is another ex-Disk Guardian feature designed to verify that every sector block on your volume or drive can be read correctly. It is recommended to run this test if you notice abnormal sound emitting from the drive, or the Finder reports some of the files cannot be copied.
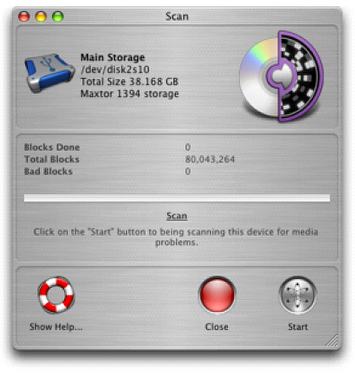
The time required for a Scan test is dependent on the drive’s capacity and rotational speed. The blocks are read in sequential order and the operation is performed on all blocks. Drive Genius will not remove bad blocks — you may need to reformat the drive with Drive Utility that comes with Mac OS.
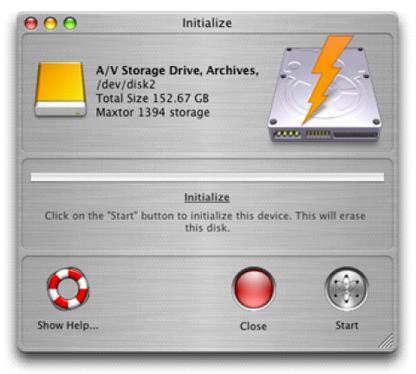
Initialize
Drive Genius’s Initialize feature will:
• Install the Apple disk driver
• Write a partition map
• Create a new volume and mount it to the desktop
If you are initializing your boot drive or you only have a single drive connected to your system, you will need to boot the system from the Drive Genius CD.
Drive Genius ships with a very thorough, nicely illustrated PDF user's manual. Also included in the manual is a tutorial by Dave Bayer on "Moving the swap file in OS X,": which can also be read here:
http://www.math.columbia.edu/~ bayer/OSX/swapfile/
I've found Drive Genius in general to be a worthy successor to Norton Utilities/SystemWorks for the OS X era, with an amazingly comprehensive range of functionality. It's a tool you’ll be happy to have around whenever your hard drive needs either first aid or intensive care, and the drive management features could prove very convenient as well.
DriveGenius 1.1 seems to be more solid and slick than an earlier version of the application I tested. Aside from the aforementioned inability to verify and repair your boot volume, I didn't find much to complain about. Overall it's a nice piece of work that has been incrementally improved with this release.
System Requirements
• Drive Genius requires a system with a G3 processor or higher that is capable of running Mac OS X 10.2 or above.
Drive Genius sells for $99.00. Customers who purchased Disk Guardian prior to November 1 2004 can upgrade to Drive Genius for a special upgrade price of US$49.00 (US$10 to purchase on CD media).
For more information, visit:
http://www.prosofteng.com
and
http://www.prosofteng.com/products/drive_genius_info.php
The PowerBook Mystique Mailbag
Kensington laptop stand
Quest For The Silent Laptop
From Anson Chiu
Just read your review on the laptop stand...
I see in your pics, that you have your 12" ibook installed. However, my only concern is that my 12" powerbook is slightly shorter in depth in comparison to your ibook. In the pic, there is not much clearance from the top shield of the stand, to the lcd-hinge. Does the stand come with thicker blue bumpers for the base, so my 12" powerbook will sit a tad higher in the stand to compensate for the difference in laptop size?
Please let me know, thanks
Anson
Hi Anson;
Good question. I don't have a 12" PowerBook handy to try, but the depth from the blue pad to the lip of the stand's front cover is exactly 8 1/2 inches.
There are no optional spacers, but it wouldn't be difficult to make one with a bit of closed-cell foam or somesuch.
Charles
From Andrew Main
Charles,
You might be able to figure out what kind of HD is in your iBook using System Profiler. Click on ATA under Hardware. My Hitachi E7K60 7200rpm 40GB drive is identified as "HTE726040M9AT00."
I recently replaced a Hitachi 5400rpm 40GB drive in my "Pismo" PB with the 7200rpm drive, and am happy to report that the latter is if anything even quieter; the previous drive was nearly silent, but frequently made an odd rattling sort of noise (I don't think there is anything wrong with it, just some kind of maintenance I'd guess); the 7200 makes a steady white-noise sound, but it's not unpleasant and can only be heard by listening closely when the room is entirely silent.
The big advance in noise control was the development of Fluid Dynamic Bearings a few years ago; I was excited to first read about it, and very pleased with my first FDB drive, the 5400rpm Hitachi 40GB, which was a huge relief after the very noisy stock Pismo drives. I've always stuck with IBM/Hitachi drives (mostly because they're what Apple's mostly used since the first PowerBooks), so have little experience with Toshiba or Fujitsu, except for bad experiences with one or two that left me with no incentive to investigate further, since the IBM/Hitachi drives are generally excellent.
I too find the fan in my Pismo very aggravating, and do my best to keep it off. It only seems to come on when something odd pushes the CPU usage way up; I've learned to open Activity Monitor whenever the fan comes on and see who's hogging the CPU. Certain web pages (notably the International Herald Tribune) suddenly jump Safari's CPU usage from its usual 10-30% up to 70-80%; once I close them, it goes back down to around 20%, and the fan goes off after another minute or so (whew!). The CanoScan software that came with my CanoScan N670U scanner (otherwise great) is another culprit; it'll also hog 80% of the CPU for no good reason. Just sloppy coding, I guess.
Having been told that the Daystar 550MHz G4 upgrade would actually run cooler than the 500MHz G3, I was hoping not to have to hear the fan again at all, but haven't been so lucky. It's about the same in OS X as the G3: mostly silent, but the fan comes on with intensive CPU usage, as above, or when doing large copies (e.g. 20GB from one drive to another) -- not surprising, given OS X's almost incredible copying speed, which must be using something pretty hard.
But in OS 9 the G4 has become a disaster: the fan runs about half the time (comes on for ca. 15 minutes roughly every 15 minutes), even when I'm doing no work at all, the computer just sitting idle with a few apps open. The problem may have something to do with PageMaker 5, admittedly an old app that is the main thing I run when booted in 9; once when I tried using PageMaker 5 in Classic under OS X, I found Classic's CPU usage skyrocketing, and the fan came on. (BTW, Classic is identified as "(null)" in Activity Monitor, for no reason I can figure out.) I haven't had time to test in detail, but it's clear the fan comes on much more in OS 9 with the G4 than it did with the G3. I've come to dread having to work in OS 9 since installing the G4 CPU.
Do you ever run your upgraded Pismo in OS 9? What's your experience been with the fan?
Andrew
Hi Andrew;
Thanks for the tip about Apple System Profiler possibly being able to ID the hard drive in my iBook. I tried running ASP, but it keeps crashing. It's been 24 days since my last reboot, which sometimes makes some programs behave oddly (corrupted memory?). I'll try again after ai reboot.
Actually, Apple has also used Toshiba and Fujitsu drives as OEM units in PowerBooks (my Pismo and my son's Lombard respectively). The 20 GB drive in my iBook is quieter than "white noise." It's virtually silent, even with zero background noise.
I have to say that I can't recall booting into OS 9 directly even once since the Daystar upgrade was installed in my Pismo in Jan. 2004. Certainly not for any production work. Possibly just for a few minutes to run DiskWarrior or some other minor task. Shows how thoroughly I'm switched.
In OS X, I find that the Pismo runs somewhat hotter than with the OEM 500 MHz G3 processor. The fan never came on even once with the G3. It has spun up ahandfull ov times over the last 15 months — all during hot (for Nova Scotia) summer weather.
Just a thought; have you downloaded and installed the OS 9 version of the Daystar support software?
Charles